Showing posts with label 12daysDYIholidays. Show all posts

Tuesday, December 6, 2011

Day 5: Holiday Wreaths

title

I wish I could have a wreath on my front door. But, being in an apartment building – and not really knowing the other tenants – I would be worried that it would get stolen or destroyed. So that being said, I sadly won’t be making a wreath this year. But, I still wanted to share some wonderful-wreath-making tutorials that I found on other people’s blogs:

Alisa Burke: Paper Flowers Holiday Wreath

Simply Camylla - Felted Holiday Wreath (scroll down for tutorial :)

Martha Stewart – Pinecone Wreath

Homemade.TipJunkie - Winter Wreath Tutorial

There are tons more on the internet – just visit google and type in “Wreath Tutorial”

Happy Wreath Making!

Friday, December 2, 2011

Day 4: Pop-Up Reindeer Cards

title_thumb2

Today, we’re making pop-up reindeer cards. I got this pattern off MarthaStewart.com so I won’t take credit for it. They even have a video on the website on how to make it. I will be showing you pictures, and linking to the appropriate patterns for you to make it easy to complete this project.

Now, I have added my own personal creative touches to this project, and it’s the perfect demonstration how you can take a pattern and make it yours. I’ve been waiting for the snow, so I decided to make this card, well, more snowy.

Materials:

  • Coloured cardstock
  • Glue
  • Scissors
  • Printed-off patterns – you can find them here, here and here
  • For my version: acrylic paint, clear coat and glitter

1. First following the pattern cut out all your pieces. I don’t use the ornament pieces for my cards. Be sure to glitter your pieces at this step. IMG_1884

2. I also cut out a ‘landscape’ that will go in front of my reindeer. This way, the bottom is sort of hidden.

IMG_1885

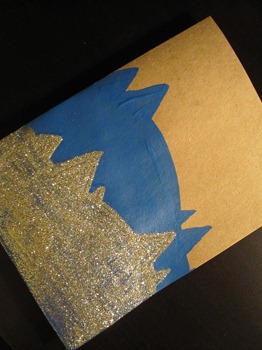
3. Next start designing your card. I begin with the front. I painted with blue acrylic paint, and then glittered some hills in front. On top of this glitter (once dry, of course), I used a coat of brush on clear coat. This prevents the glitter from getting all over the person who receives this card, as I’m sure they would not appreciate that.
IMG_1886

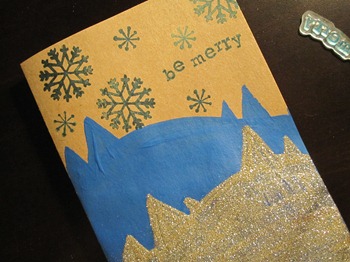
4. I then used the same stamps that I used for my ornaments to stamp on some snowflakes and a cute saying. Now the front is ultimately a winter wonderland :)
IMG_1897

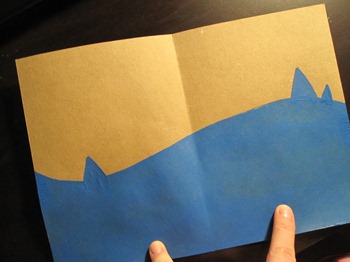
5. Once that’s dry, you can begin working on the inside. I paint out my basic blue background – anyone can paint this, sans skills required!
IMG_1888

6. Now begin placing your pop-up pieces. You can either mark your card based on the pattern from Martha Stewart. What I did: I folded up the pieces, and placed them, being sure that they do not extend from the sides of the card, and then glued the tabs.

IMG_1891IMG_1899

7. Make sure that everything pops up right.

IMG_1892

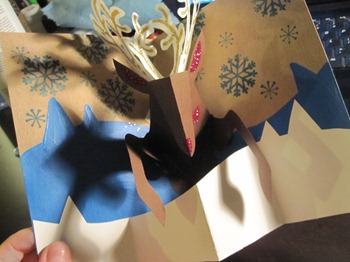
8. Next, glue on your landscape, and then you’re done! You’ll notice that this one below has snowflakes stamped on the inside as well – I only did it to this one. I realized after, that this didn’t leave much room for a holidays greetings.
IMG_1904

Here comes Rudolph!

Tuesday, November 29, 2011

Day 3: Snowflake Stamp Ornaments

title

For this DIY, we’re making ornaments out of clay. They don’t have to be snowflakes – they can really be any shape that you want to cut out. Once again, I did this in the evening, so the lighting isn’t amazing.

Here’s what you need:

  • Clay of a sort – I used Fimo, but you can use any sort of clay.
  • Cookie cutter to make a shape
  • Stamps – to stamp your design in
  • Paint brush to smooth imperfections, fetching stray hairs ect.
    • Optional: glazing / clear coat, acrylic paints.

Instructions to create these lovelies:

  1. Roll out clay until fairly thin.IMG_1871
  2. Stamp your designs into the clay, being careful to get the imprints deep enough
  3. Use the cookie cutter to cut out the shape, peel the clay from around the clay and cookie cutter (I keep it in the cookie cutter for stability reasons until I’m done).
  4. Poke a hole through the top with the end of the paint brush for a ribbon later
  5. Place on the baking sheet. If using Fimo, or another baking-required clay, follow directions to bake. If air-dry clay, let dry completely – this may take a day or three.

The rest of this tutorial is optional. You can stop here if you`d like to keep your ornament simply white. For those who are continuing, you will need acrylic paint. I`m using a dark blue.

6. Use a small paint blue to paint inside the stamps. This might be difficult depending on your design. Wait until dry.

7. Use white paint to correct the areas where the blue might have taken control of itself:

IMG_1907

8. Finish with a clear, protective coat and string a ribbon through. Hang and enjoy :)

Here are some of the others that I created. If you don’t have a cookie cutter at all, you can always form a circle shape with your hands. The unevenness seems to add to the artsy-ness of the piece.

Friday, November 25, 2011

Day 2: Painted Glass Ornaments

title

This is another simple, quick project. Although I am not making any of these this year (sadly, I must limit what I choose to make based on time-restrictions and the ever-looming Christmas budget…not to mention, craft supplies are scarce where I live LOL). But, since they are such a great idea, I still wanted to share with everyone. If your children are old enough to be careful with paint (as I'm not sure if it will wash out of clothes), then they would be able to make their own ornaments

What you need: clear glass ornaments, paint designed for glass - preferably translucent, brush – or acrylic works as well (bottled craft-acrylic, not tubed, especially if you’re pouring it inside of the ornament and swishing it around.

Instructions: these are simple: paint the glass glass (either on the inside, or the outside), let dry, hang and enjoy!

Here are some tutorials that I have found on the internet for these easy ornaments:

Buggie and Jellybean: Paint Ornament Tutorial

Kaboose: Festive Polka Dot Ornaments

and the cutest for last: Painted Snowmen and Penguin Ornaments

Tuesday, November 22, 2011

Day 1: Graffiti Holiday Cards

title


Welcome to the 12 Days of DIY Holidays. During this mini-series, I’ll be sharing some of my own DIY projects - as well as featuring others that I have found on the internet and in blogs. I hope that this series inspires everyone to be a little creative this holiday season.


First up is graffiti holiday cards. The wonderful things about these cards is that you can just have fun creating them – there is no being precise or perfect, you can just go with the flow. The one thing that you need to understand about this project: there are no limits or guidelines. How I create my card below isn’t how you need to create yours.


What you’ll need:


  • Cardstock folded into a card or ‘pre-made’ cards on cardstock or watercolour paper.


  • Various painting, drawing and craft materials


    • What I’m using: Masking fluid, watercolour paints, watercolour iridescent medium, black markers, white paint marker


  • Christmas song lyrics

Instructions:
1. First you need to pick a holiday song. I’m starting with “The Christmas Waltz.” It has been stuck in my head for about a week now, so it’ll be good to get it out of there! My specific lyrics that I’m working with:


It's that time of year when the world falls in love. Every song you hear seems to say: Merry Christmas. May your New Year dreams come true.


2. Next place those lyrics on your card in pencil in a way that you like them.


3. I then use masking paint to ‘reserve’ the areas where the words are. I’m not too careful about it, I just apply it quickly and a little bit messy. Let dry.


4. I apply my first background layer. Let dry.


5. I add some messy paint details. Let dry.


6. Remove masking fluid, and begin to accent the letters with the black marker.


7. Some more details and shimmer.


And then we have our card!


xmas1


You’ll have to excuse the picture quality. I did this project at night, so my camera didn’t take the colours well. The colours are truest to the final image, the scan.