Monday, October 31, 2011

Monday Art Class–Drawing Exercise #2

Today we’re going to extend on the last class with a drawing exercise.

As you might recall last week, we were drawing without looking. Training the eye and hand to coordinate a little bit better. Now, this week: we’re going to be drawing the same subject. You can look: but you cannot lift off the paper. That’s right – we’re going for a continuous line today!

IMG_1671

So there is mine. I only did one, because this exercise is a little bit slower. You take your time to try and get it as accurate as possible. I once again used charcoal and 18x24” newsprint pad – love these things for these sorts of important exercises. At a couple dollars, maybe less, each – you cannot go wrong!

Take your time this time. Think about how you approached the subject last week, and observe where would be the most practical place for you to start and stop. I started at the top in the middle, but you might find it better to start somewhere else: everybody’s creative though processes are different.

Once you’re done – come back here and post a link and share :)

Friday, October 28, 2011

End of October Life Update

Things have been busy…really, when have they not been lately? lol. I played hooky on Monday from art class. I didn’t have enough time with working the weekend and being on call at the hospital, as well as working on commissions to write up a good class. I have a good acrylic effects one in the making right now though, and it will be complete with a painting demo. As well as some more drawing exercises – these exercises as so quick to participate in, and they build amazing skills.

Here’s a list of what been going on:

  • Works loads at the hospital…and lots of call. My job is going wonderfully, and I don’t think I could be happier then where I am. Sadly, I’m just replacing someone who is taking a maternity leave, and once the new mom returns I will be placed at a different hospital within the ‘network.’ I just hope that there will be a permanent opening, so that I can settle down somewhere. – My hospital organization runs about 5 hospitals in this area, of which I can work between them all under one employer and maintain seniority – it’s sort of a nice deal.
  • Finalizing plans for James and my ‘weekend getaway’ to Collingwood in mid November. We’re staying at the village at Blue Mountain Resort for 2 nights, 3 days (where we also get out yearly snowboard passes – I bet most of you didn’t know I did that! lol
  • Finding a Halloween costume for work. Finally just settled on the typical ‘cat ears n’ tail’ getup with some black scrubs. I work in a radiography department in a hospital – so most costumes just aren’t practical for moving patients and working with patients who – if from emergency – can technically be bleeding, muddy, ect – so anything extravagant would just get in the way, and maybe even get ruined.
  • Starting a collection – I’m not a huge collector, so this is sort of big for me. I’m going to start collecting the Dept 56 Christmas village houses, in the Dickens theme. I’ve started with scrooges house this year. Very excited for it to arrive!
  • Painting commissions are in full swing – If you are interested in one with a Christmas deadline, please contact me ASAP – I can only take so many with that deadline, and it’s filling in very quickly!
  • Christmas cards – since I’m only offering original painted ones, they have been keeping me on my toes. I’ll be posting an update later with a whole lot of new ones.
  • Working on some side painting projects – I have a new watercolour series I’m working on, and there’s always a large acrylic or oil painting sitting incomplete in my living area that I can dabble on here and there.
  • Finalizing plans for a Toronto trip with my Mom to see the One of a Kind show in Nov / Dec. I’ve been trying to make up some of my Christmas lists, so I can do some of my Christmas shopping there.

There are a few more little things, but these are the major ones. I have today off, so I will be running around with errands (post office), and painting. And then I work again this weekend.

Thursday, October 20, 2011

Speak

I’ve been working on this series for awhile, and due to a wandering mind it took a little longer than I thought it might.

speak_series

“Speak” is a series of four paintings, two landscape and two portrait with various “sayings”, being sung by little birds. There is “Hello”, “Tweet”, “Chirp” and “You Are Lovely” You can find the series here.

Monday, October 17, 2011

Monday Art Class: Drawing Exercise #1

Today we are going to be doing a quick simple drawing exercise. This will loosen you up if you’re about to start a harder drawing, and put you a little bit out of your comfort zone. But, it will also teach you to look at things in different ways. The materials that you need are: a blanket (something smooth, nothing intricate). a chair, paper and a drawing utensil. I will be using some charcoal and newsprint.

First set up the blanket to that it’s hanging off the chair. Make sure to arrange it so that there is a good number of folds. Here’s how I arranged mine:

Next you are going to draw the blanket following specific drawing instructions (we are not focusing on the chair today, so just ignore it. That being said: it’s best if you arrange the blanket to cover most of your view of the chair).

Here’s the drawing instructions: you are to draw your blanket using

one continuous line

That means: you cannot lift your pen, marker, charcoal – whatever! – until you are done your drawing. To do this, you will need to observe and ponder how you are going to approach your subject. Also,

you will not look at your paper

– that’s right! NO PEEKING! You can look to see where you place your pencil down in the start, but once you start drawing, life those eyes up to the subject and don’t look down again until you’re done.

Here are mine:

Yes, these are most definitely not pretty pictures. They do just look like scribbles. But that’s not the point, and not all beneficial drawing exercises look pretty – but they can be effective. I did it a couple times (and I recommend that you do the same), trying a different approach each time. Sometimes worked out better than others. Also, as you re-attempt the drawing each time: you ‘learn’ from it, and get a little better each time.

If you joined me today with this exercise, please post a link to your blog or picture to share with everyone your experience. Happy scribbling!

Wednesday, October 12, 2011

My Creative Space

I’ve been packing last night, late into the night…

But I got all my orders done :o)

See more creative spaces here.

Things that make me happy #1

When my fur-ball, Oreo, actually decides that he will cuddle with me…

This will be a new feature in my blog. I loved ‘the book of Awesome’ so much, that I thought it was a great idea to take a moment and just remember all the thing that make me happy.

Tuesday, October 11, 2011

The 2012 Sketchbook Project: You and I

I have been in love with with the song “You and I” by Ingrid Michaelson.

Love this song, it’s just too cute!

I decided to use some of her lyrics in my latest sketchbook layout:

youandi_small

‘You and I’ – Watercolour and ink

The words in the clouds are not from the song, I just added them in to tie them into the theme of my sketchbook.

I feel that I’m getting close to the end of my sketchbook, but I also feel like there is so much left to do on it. I will say this: I am ridiculously happy that I got my sketchbook when the 2012 program started. If I was getting it now (with it due in January), I do not think that I would have time to complete it the way I want.

Monday, October 10, 2011

Monday Art Class: Masking Fluid

Happy Thanksgiving to all my fellow Canadians!!!

Today, we will be looking at masking fluid, and then it will follow with a painting demo. Sometimes, painting with watercolours can be tricky, especially when you’re applying background washes, and there’s small, or intricate, items to paint around. Since watercolour is transparent, it’s not like acrylic where you can paint a layer, and then paint on top without a problem. This is where masking fluid plays an essential role of taking out some of the stress.

Masking fluid reserves white space. You apply it, let it dry, paint on top, and then remove to reveal perfectly preserved areas of white. There are some things that you need to know about it:

  • Be sure to shake the bottle, so that all the elements of the fluid mix together to provide consistent coverage. Note: these bottles last forever! This is my second bottle of masking fluid, I’ve had it for probably two years, and it’s only a quarter gone – a wonderful investment!
  • Some masking fluids are tinted, some are not. The tinted ones let you see it better on the paper. Neither will leave behind colour or residue. I’ve worked with a few different brands, and they all work the same – so my preference is pretty neutral. I tend to buy whichever may be on sale at the time.
  • Use an old brush. This stuff dries quickly, and you may not be able to wash your brush and restore to it’s original state before you’re finished. I have two reserved brushes, one large and one small. They are brushes that I no longer used for painting. They tend to get a plastic-like feeling.
  • You must let the fluid completely dry before applying paint over it
  • Be careful for air bubbles: if they ‘pop’ before it’s dry, you may end up with small dots of colour where you had originally wanted white
  • In my experience: painting masking fluid over colour has not worked well for me: it takes some of the colour away with it when I remove it.

This is a wonderful item to experiment with. Once it’s dry, use an eraser to gently remove it. If you are too rough, you may take some paper with it too.

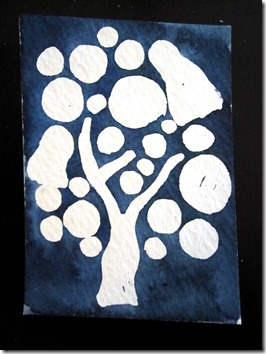
Now for my painting demo. I am using masking fluid here to reserve my tree against a black sky.

If you don’t have masking fluid there are other techniques to reserve white in watercolours. You can use masking tape (cut into a shape if needed….and masking tape works for acrylic too). Just try not to leave the masking tape on for more than a day or two if possible – the longer it’s on, the harder it is to remove.

First is to create a sketch, and then apply the masking fluid where necessary:

halloween

Once dry, you can apply the background wash:

Wait until the paint is completely dry, and then you can gently remove the masking fluid, and you’re left with white:

And then fill in the reserved spaces:

ghostly03

Ghostly – Watercolour ACEO

I couldn’t resist doing little ghosts, I do just love Halloween :o).

Thursday, October 6, 2011

My Creative Space

desk

I got a new desk today!! Since moving into my new apartment at the beginning of the summer, I had been doing my watercolour paintings on the living room table, sitting on the floor. It was frustrating, but since my apartment is quite small I really wanted to try and do without it. My kitchen table gets no natural light, so I find that I’m sucked of creative inspiration there. This cute, simple little desk fits perfectly between my bedroom and bathroom door. The painting is from a trip to the Dominican that I managed to bring back with me :o)

I’m also been busy with paintings:

See more creative spaces here.

Monday, October 3, 2011

Monday Class: Inspirations–Klimt

I have always loved Gustav Klimt mostly for his portraiture like paintings – I enjoy how he portrayed the face / body of his subject in a realistic manner, and then created with rest with amazing intricate patterns. I especially enjoy his pieces with romantic embraces, there is just so much feeling that radiates from them.

Klimt was from Austria and he often portrayed more sensual women in his work. He contributed to the Art Nouveau movement. He puts in so much intricate details into his works, they are simply stunning.

If you would like to learn more, there is a website dedicated to him and his work: http://www.klimt.com/

Some of my favourites:

The Kiss – 1907-1908, oil

Birch Forest – 1903

Fulfillment - 1909

Here is my sketchbook page inspired by him:

in his arms

“In His Arms” – pencil, watercolour pencils and white acrylic pen

Homework: Work in your sketchbooks to create a sketch / drawing inspired by Klimt’s unique style.